Vous pouvez lier l'angle de la toile à NumericProperty , pour le modifier depuis votre code. Tout ce que vous avez à faire est de calculer ces angles correctement. Après avoir joué un peu avec, j'ai créé le code suivant :
from kivy.app import App
from kivy.uix.widget import Widget
from kivy.lang import Builder
from kivy.animation import Animation
from kivy.properties import NumericProperty

import math

kv = '''
<Dial>:
    canvas:
        Rotate:
            angle: root.angle
            origin: self.center
        Color:
            rgb: 1, 0, 0
        Ellipse:
            size: min(self.size), min(self.size)
            pos: 0.5*self.size[0] - 0.5*min(self.size), 0.5*self.size[1] - 0.5*min(self.size)
        Color:
            rgb: 0, 0, 0
        Ellipse:
            size: 50, 50
            pos: 0.5*root.size[0]-25, 0.9*root.size[1]-25
'''
Builder.load_string(kv)

class Dial(Widget):
    angle = NumericProperty(0)

    def on_touch_down(self, touch):
        y = (touch.y - self.center[1])
        x = (touch.x - self.center[0])
        calc = math.degrees(math.atan2(y, x))
        self.prev_angle = calc if calc > 0 else 360+calc
        self.tmp = self.angle

    def on_touch_move(self, touch):
        y = (touch.y - self.center[1])
        x = (touch.x - self.center[0])
        calc = math.degrees(math.atan2(y, x))
        new_angle = calc if calc > 0 else 360+calc

        self.angle = self.tmp + (new_angle-self.prev_angle)%360

    def on_touch_up(self, touch):
        Animation(angle=0).start(self)

class DialApp(App):
    def build(self):
        return Dial()

if __name__ == "__main__":
    DialApp().run()
Je calcule la différence entre l'angle initial (après avoir appuyé sur la souris) et l'angle ultérieur en on_touch_move . Puisque l'angle est une propriété, je peux aussi le modifier en utilisant kivy.animation pour faire revenir le cadran après avoir relâché le bouton de la souris.
MODIFIER
on_touch_down événement pour le cercle d'enfants :
from kivy.app import App
from kivy.uix.widget import Widget
from kivy.uix.floatlayout import FloatLayout
from kivy.lang import Builder
from kivy.animation import Animation
from kivy.properties import NumericProperty

import math

kv = '''
<Dial>:
    circle_id: circle_id
    size: root.size
    pos: 0, 0
    canvas:
        Rotate:
            angle: self.angle
            origin: self.center
        Color:
            rgb: 1, 0, 0
        Ellipse:
            size: min(self.size), min(self.size)
            pos: 0.5*self.size[0] - 0.5*min(self.size), 0.5*self.size[1] - 0.5*min(self.size)
    Circle:
        id: circle_id
        size_hint: 0, 0
        size: 50, 50
        pos: 0.5*root.size[0]-25, 0.9*root.size[1]-25
        canvas:
            Color:
                rgb: 0, 1, 0
            Ellipse:
                size: 50, 50
                pos: self.pos
'''
Builder.load_string(kv)

class Circle(Widget):
    def on_touch_down(self, touch):
        if self.collide_point(*touch.pos):
            print "small circle clicked"

class Dial(Widget):
    angle = NumericProperty(0)

    def on_touch_down(self, touch):
        if not self.circle_id.collide_point(*touch.pos):
            print "big circle clicked"

        y = (touch.y - self.center[1])
        x = (touch.x - self.center[0])
        calc = math.degrees(math.atan2(y, x))
        self.prev_angle = calc if calc > 0 else 360+calc
        self.tmp = self.angle

        return super(Dial, self).on_touch_down(touch) # dispatch touch event futher

    def on_touch_move(self, touch):
        y = (touch.y - self.center[1])
        x = (touch.x - self.center[0])
        calc = math.degrees(math.atan2(y, x))
        new_angle = calc if calc > 0 else 360+calc

        self.angle = self.tmp + (new_angle-self.prev_angle)%360

    def on_touch_up(self, touch):
        Animation(angle=0).start(self)


class DialApp(App):
    def build(self):
        return Dial()

if __name__ == "__main__":
    DialApp().run()
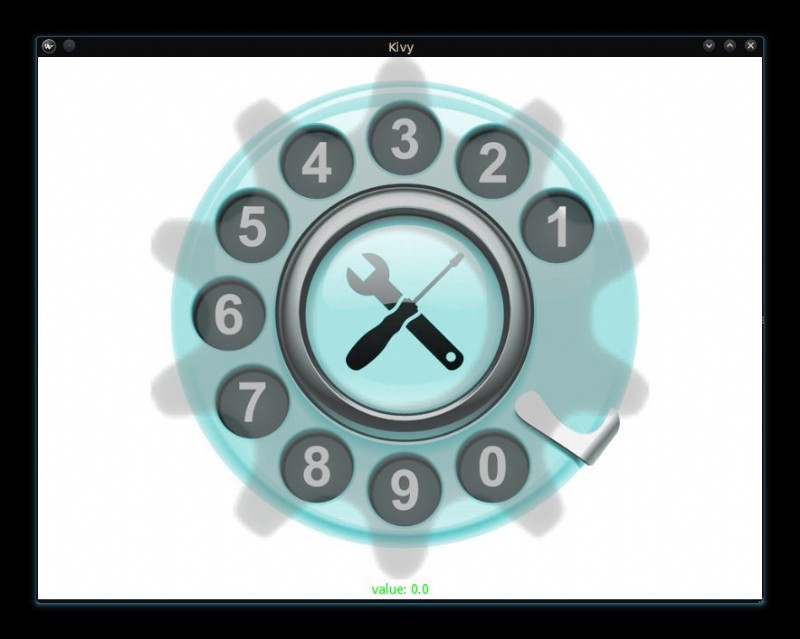
Vous pouvez utiliser GearTick du jardin qui est un curseur rotatif. Ce n'est pas exactement ce dont vous avez besoin mais peut être adapté à vos besoins. "Par défaut, il permet la rotation dans le sens inverse des aiguilles d'une montre, vous en auriez probablement besoin pour aller dans le sens des aiguilles d'une montre" (mise à jour :le widget a maintenant un orientation propriété qui peut être définie sur 'sens horaire' ou 'sens anti-horaire').
Vous auriez besoin de gérer le retour élastique et l'arrêt au "doigt d'arrêt".
L'exemple aux extrémités gère le retour élastique à l'aide d'une animation, mais vous devez toujours gérer/implémenter la fonctionnalité d'arrêt du doigt.
https://github.com/kivy-garden/garden.geartick
Utilisation ::
Python ::
from kivy.garden.geartick import GearTick
parent.add_widget(GearTick(range=(0, 100)))
kv ::
BoxLayout:
    orientation: 'vertical'
    GearTick:
        id: gear_tick
        zoom_factor: 1.1
        # uncomment the following to use non default values
        #max: 100
        #background_image: 'background.png'
        #overlay_image: 'gear.png'
        #orientation: 'anti-clockwise'
        on_release:
            Animation.stop_all(self)
            Animation(value=0).start(self)
    Label:
        size_hint: 1, None
        height: '22dp'
        color: 0, 1, 0, 1
        text: ('value: {}').format(gear_tick.value)
Pour installer ::
pip install kivy-garden
garden install geartick
Exemple de travail que vous pouvez copier coller ::
from kivy.lang import Builder
from kivy.app import runTouchApp
from kivy.garden.geartick import GearTick
runTouchApp(Builder.load_string('''
#:import Animation kivy.animation.Animation
GridLayout:
    cols: 2
    canvas.before:
        Color:
            rgba: 1, 1, 1, 1
        Rectangle:
            size: self.size
            pos: self.pos
    BoxLayout:
        orientation: 'vertical'
        GearTick:
            id: gear_tick
            zoom_factor: 1.1
            # uncomment the following to use non default values
            #max: 100
            #background_image: 'background.png'
            #overlay_image: 'gear.png'
            #orientation: 'anti-clockwise'
            on_release:
                Animation.stop_all(self)
                Animation(value=0).start(self)
        Label:
            size_hint: 1, None
            height: '22dp'
            color: 0, 1, 0, 1
            text: ('value: {}').format(gear_tick.value)
'''))